

Table of Contents
Want a Personalized Feature Set Demo?
Run High-Scale k6 Tests with Testkube


Table of Contents
This blog post was last updated on August 13th, 2024.
Introduction: k6 Load Testing
Kubernetes clusters are designed for reliability and a degree of “self-healing,” including scaling horizontally with more pods running in parallel, to handle sudden bursts of demand. But like all other parts of your application, from the UI to the APIs that power each service, you can enhance your baseline availability by load testing your infrastructure and understanding what happens.
One tool that helps you with that — and undoubtedly one of the most popular load testing tools today — is k6. The open-source project is cloud native-friendly and supported by a large community of developers and testers — not to mention the 2021 acquisition by Grafana Labs, the leader in infrastructure observability tools. The open-source project has 24,000+ stars on GitHub and more than 150 active contributors.
The state of testing using Kubernetes with k6
The k6 team has previously announced their intention to make k6 more friendly toward cloud-native technology like Kubernetes, but support is still in experimental stages and its integration is fairly complex if you don’t have a strong DevOps background.
To run distributed k6 tests on Kubernetes, you need to clone the k6 operator GitHub repository and then you can manually deploy it to your cluster using Make and Kustomize.
To view the results of a particular load test, you can run kubectl logs [POD] to see k6’s output but there are no instructions for seeing detailed performance testing metrics and dashboards for your tests. However, it’s certainly possible with enough customization.
Working with an operator like this will add complexity to your testing process and CI/CD pipelines. Also it still won’t allow you to store or aggregate your results over time. Good news is that Testkube does a great job of adapting K6 into Kubernetes, solving all of those problems mentioned above.
How Testkube does load testing in Kubernetes differently
Testkube tries to solve both problems by tackling the process of executing a k6 load test through the Testkube Dashboard, CLI, and API. It allows you to create end-to-end test workflows with minimal steps and maximum control.
Since Testkube is a Kubernetes-native framework, it uses CRDs to manage tests, which means that users create and run commands with kubectl testkube create testworkflow… and kubectl testkube run testworkflow…, respectively. When running the Testkube CLI — or when the CI/CD pipeline does it for you — it sends these test workflow to the Testkube API running on the cluster, which in turn manages the resources required to run them. Once your test workflow finishes, users can use Testkube’s UI to see the results if they would like.
With this process, you can aggregate any number of k6 test results in one place, and they’re stored alongside any other application tests you might be running, like Postman, Cypress, or SoapUI. You simplify the chain of load testing -> trying improvements -> testing your improvements, or even automate it entirely using CI/CD, to dramatically improve your performance testing lifecycle.
To understand this better, do read our post on how Testkube compares with k6 operator and why the former should be your preferred way to run load tests on Kubernetes.
Let’s walk through all the steps together.
Get Testkube
The fastest way to install Testkube is by signing up for a free trial of our Testkube Cloud account and configuring your environment - which cloud be an on-prem cluster like Minikube, k3s or a managed cloud cluster like GKE, AKS, or EKS.
Further, you can also choose if you want to self-host Testkube on your cluster and leverage your infrastructure or if you want to use the Testkube SaaS. Read more about Testkube offerings to choose what’s best for you. With only a few commands, you can start testing against your cluster!
With Testkube, you create Test Workflows that are a powerful way to define how your test should execute inside your test environment, including all the steps, and configurations for your testing tool of choice. You can read more about Test Workflows to understand all its features.
Create your k6 load test and run it
We've created a video tutorial that walks you through the process. This video provides a visual guide to creating and running your k6 load test using Testkube. You can watch it for a quick overview or follow along as you implement the steps yourself.
The easiest way to create a new Test Workflow is to use the Testkube dashboard. Login to Testkube, navigate to the Test Workflows tab and click the “Add a new test workflow” button.
This will provide you with four options:
- Create from Wizard - use the wizard to create a Test Workflow.
- Start from an example - use existing k6, cypress, and playwright examples
- Combine existing workflows - use with existing workflows.
- Import from yaml - import your own Test Workflow.
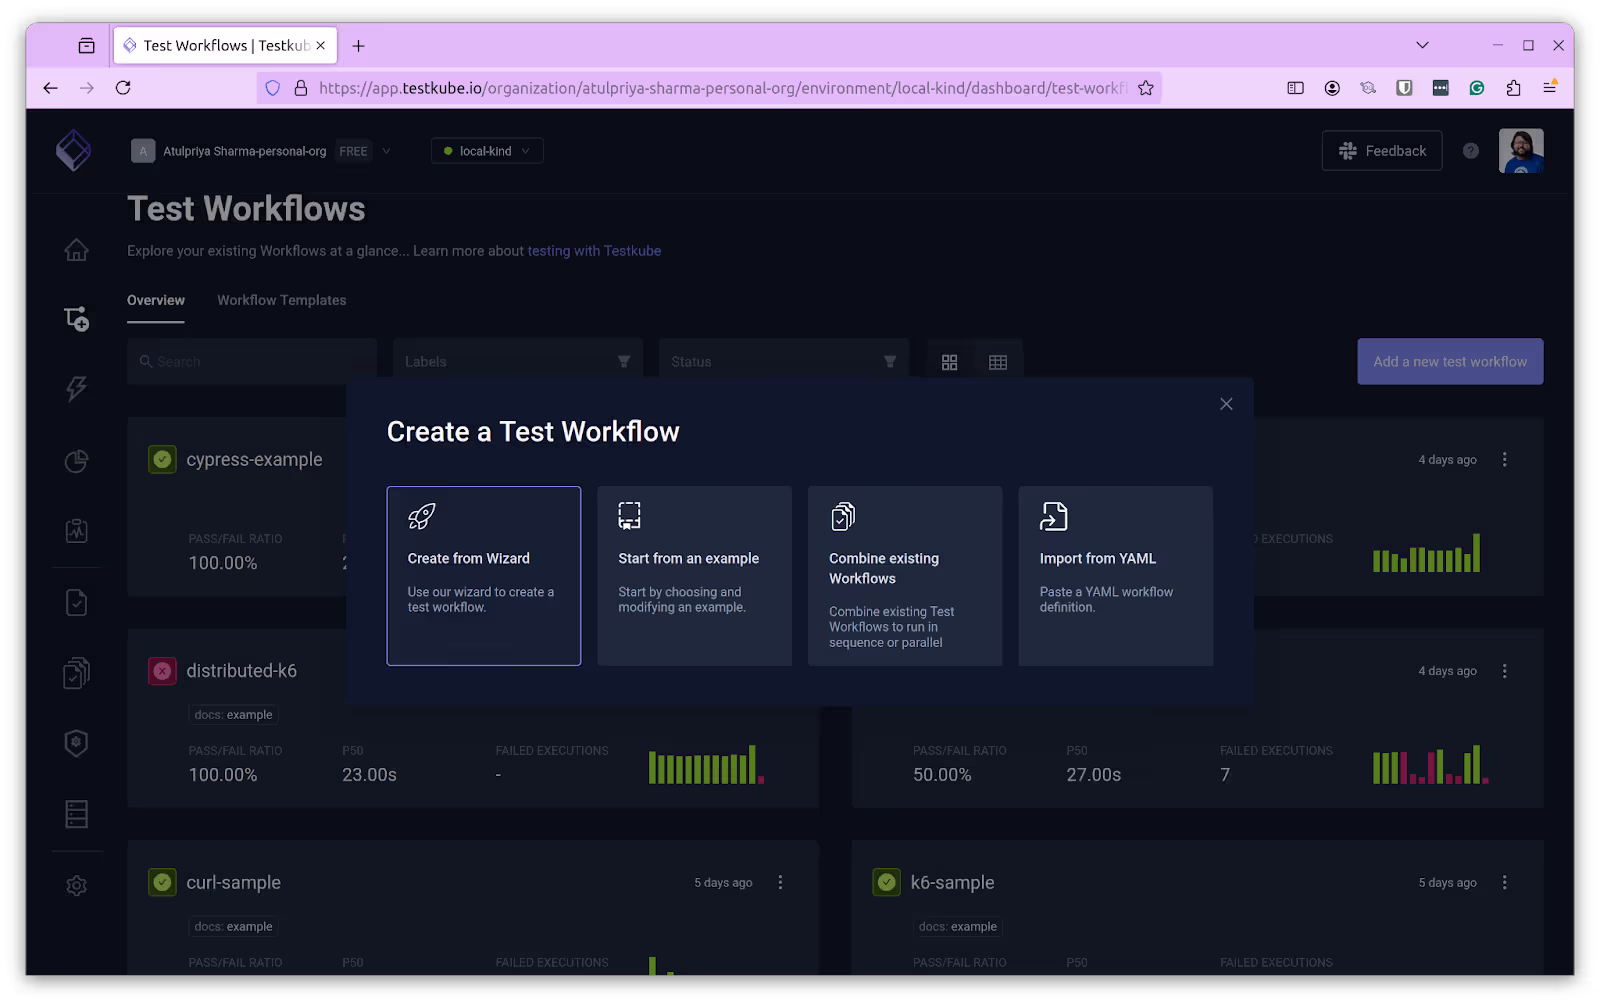
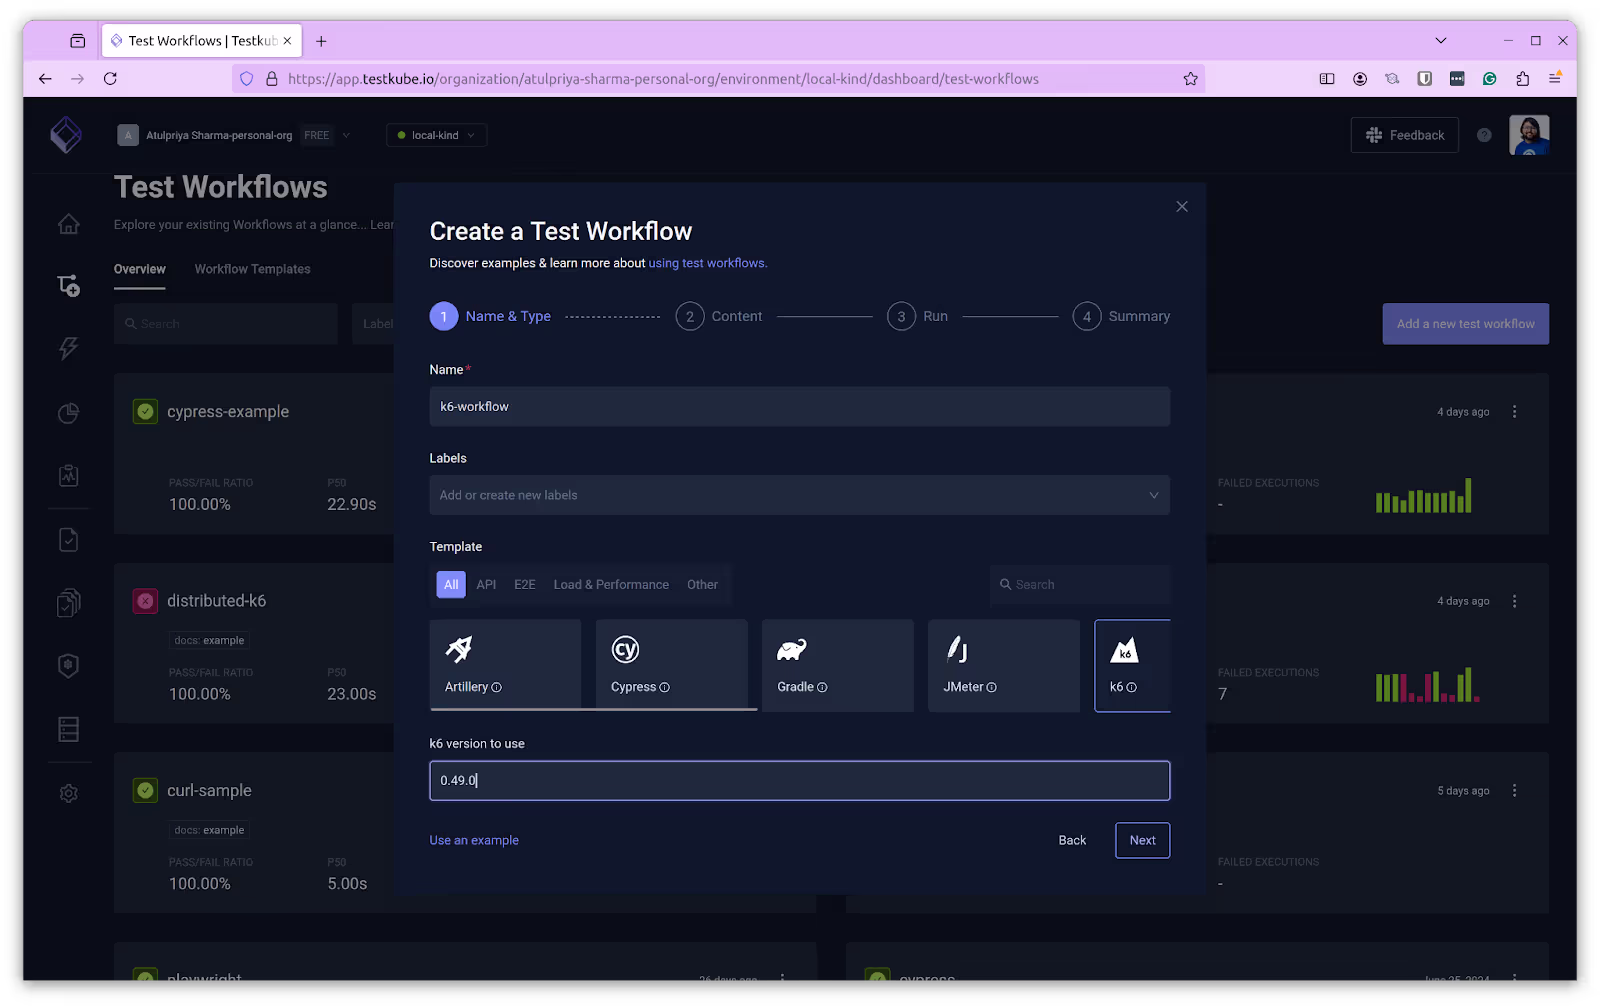
To create this workflow, we’ll choose the “Create from Wizard” option. In the following dialog, provide the following details and click on Next:
- Name: k6-workflow
- Template: k6
- K6 version to use: 0.49.0 (default)
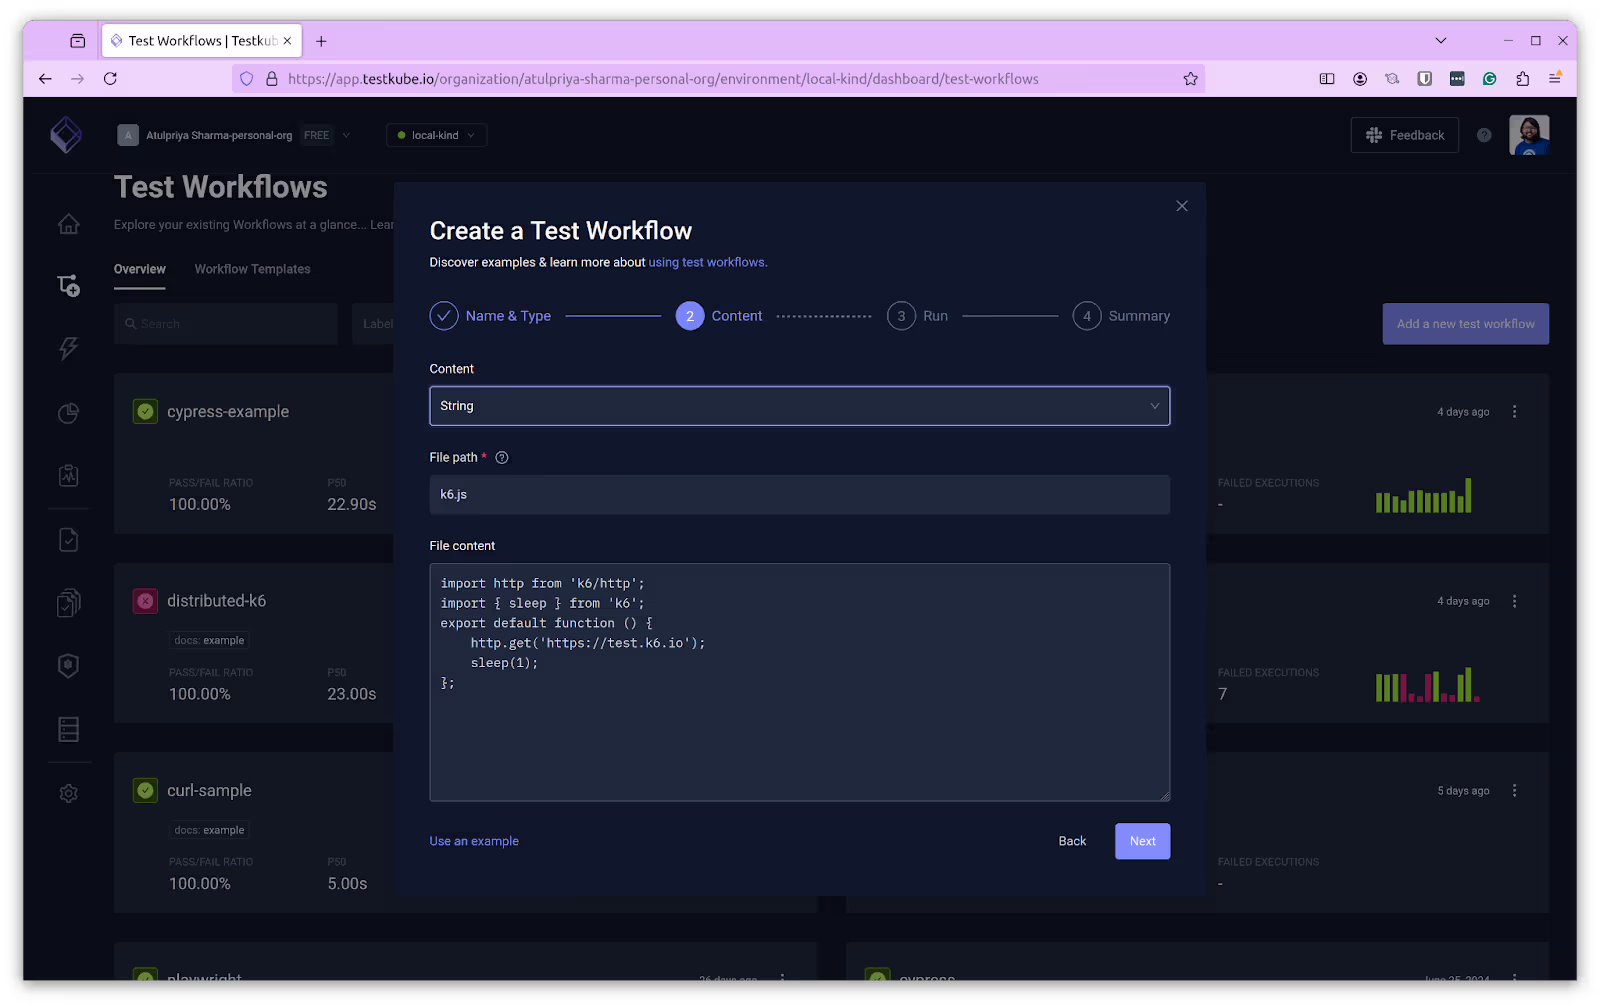
In the next dialog, choose the content as “String”. This will generate a sample test code for you and create a new file named “k6.js”.
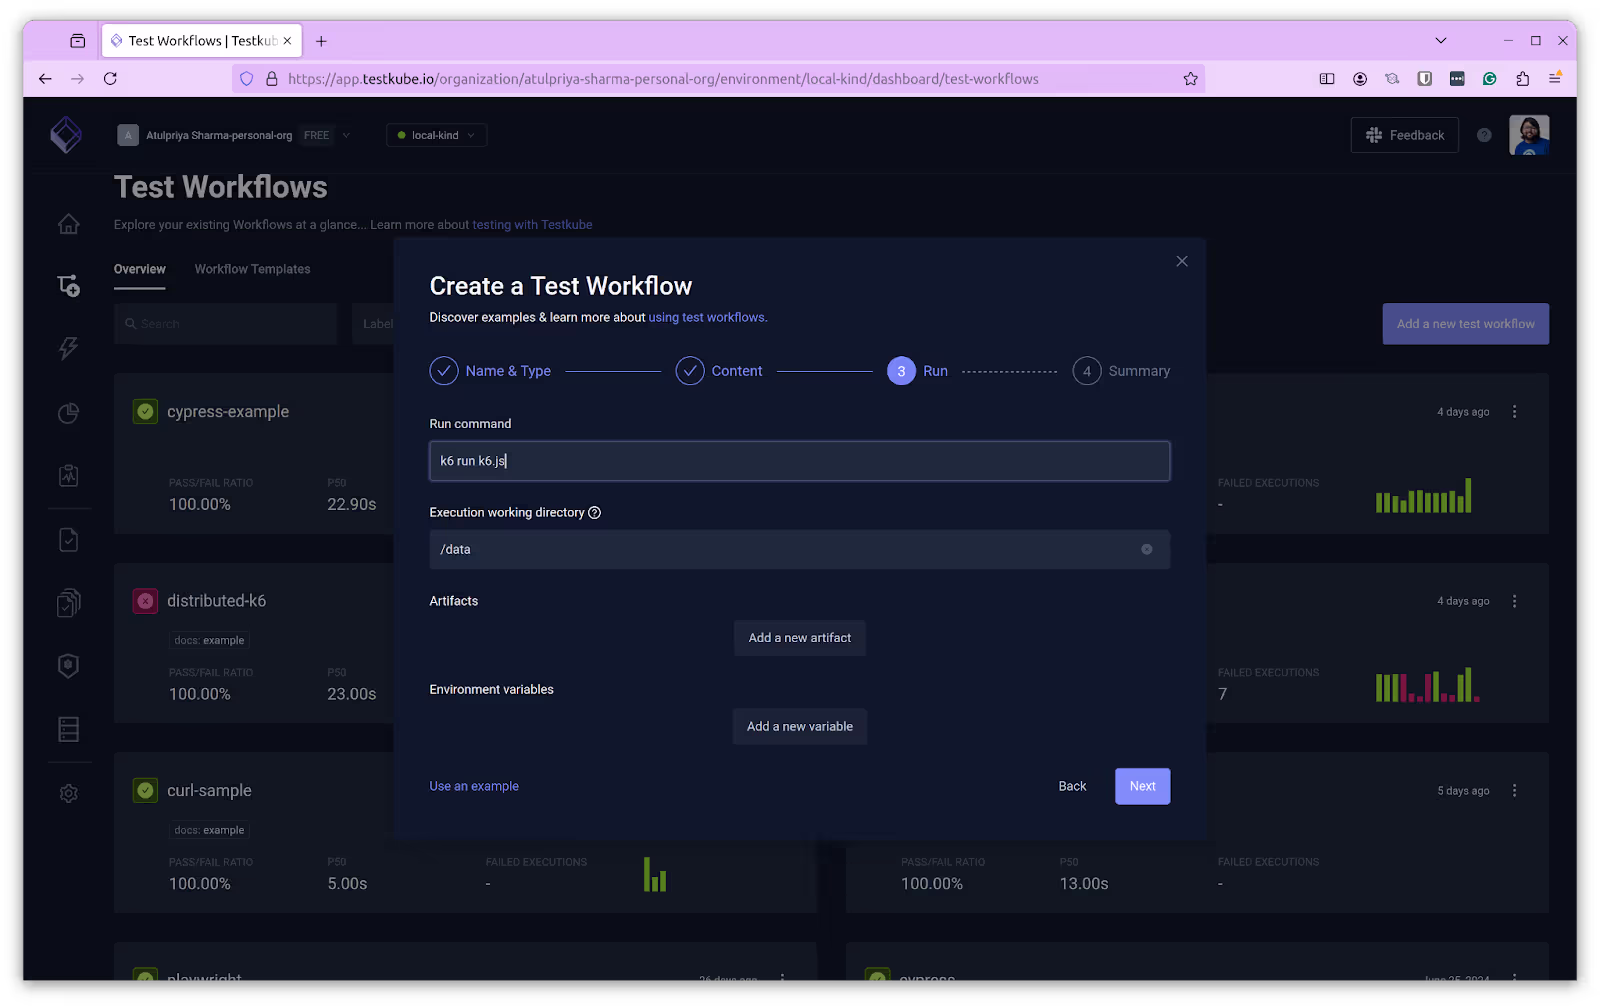
In the following dialog provide the k6 run command. We’ll use the default command “k6 run k6.js”.
Click next and you’ll see the spec file that it generated in the final dialog.

Below is the generated spec file for the k6 Test Workflow. Click on Create & Run to create and execute the first run for the Test Workflow.
kind: TestWorkflow
apiVersion: testworkflows.testkube.io/v1
metadata:
 name: k6-sample
 namespace: testkube
 labels:
   docs: example
spec:
 content:
   files:
     - path: /data/example.js
       content: |-
         import http from 'k6/http';
         import { sleep } from 'k6';
         export default function () {
             http.get('https://test.k6.io');
             sleep(1);
         };
 steps:
   - name: Run Tests
     workingDir: /data
     run:
       image: grafana/k6:0.49.0
       env:
         - name: K6_WEB_DASHBOARD
           value: 'true'
         - name: K6_WEB_DASHBOARD_EXPORT
           value: k6-test-report.html
       args:
         - run
         - example.js
     artifacts:
       paths:
         - k6-test-report.html
I won’t cover the nuances of writing a k6 load testing script here - the k6 documentation is a fantastic resource for that.
The Test Workflow will start executing and once the execution has finished, it will update the status.
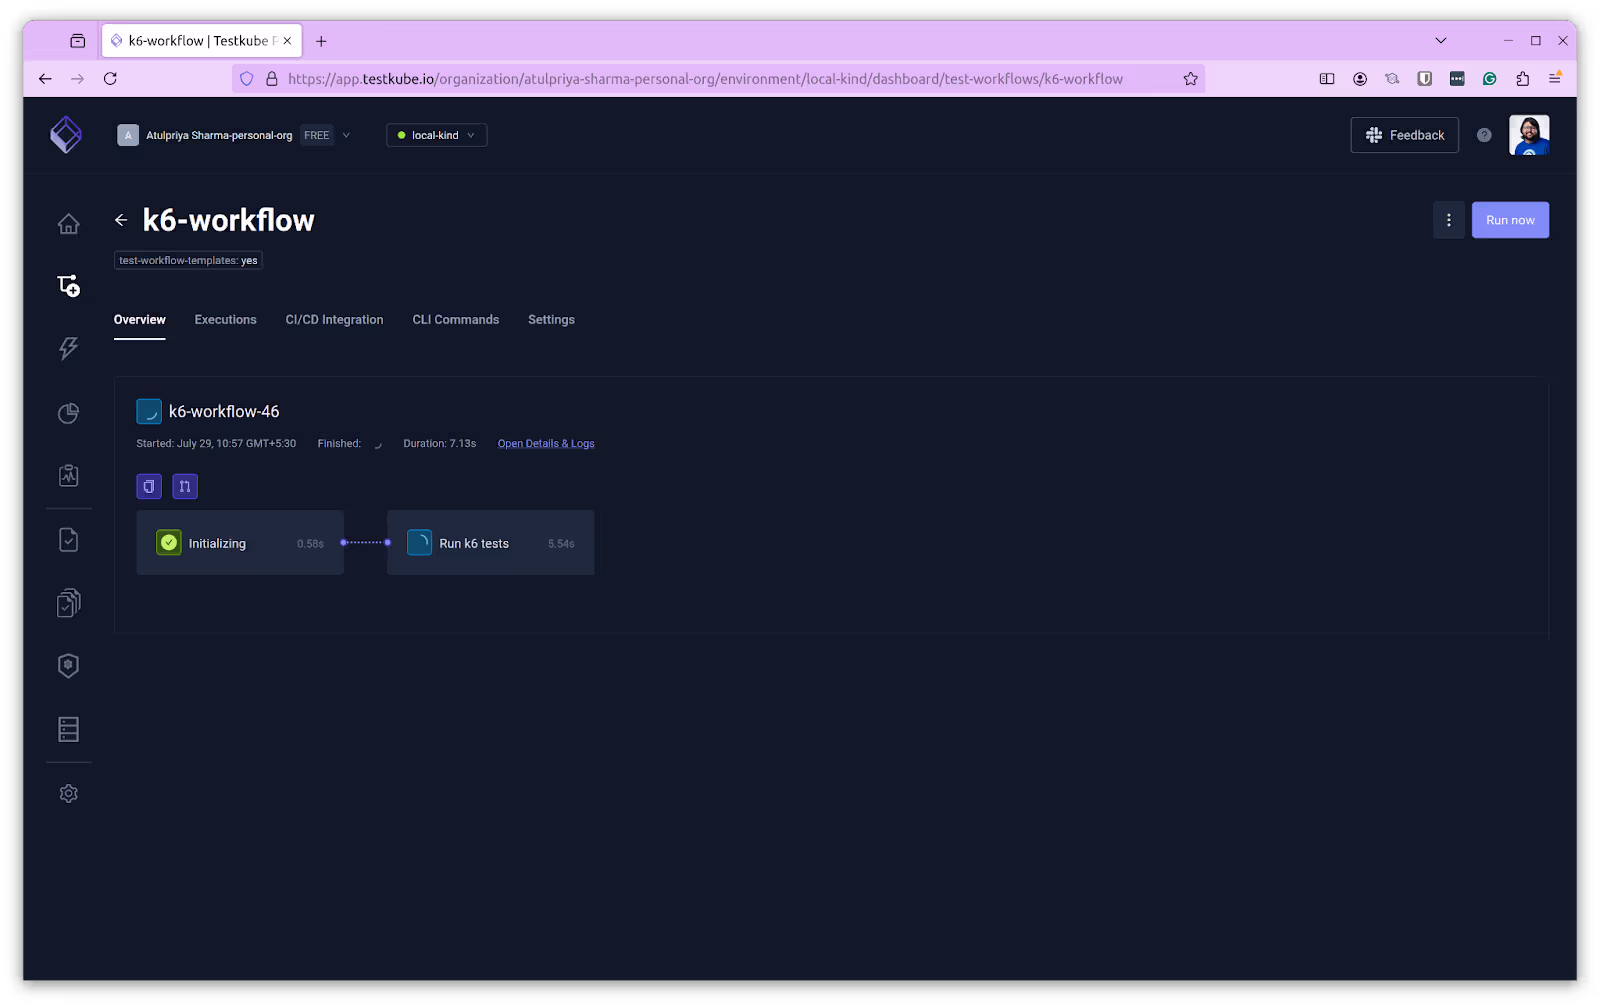
View logs and results in the Testkube dashboard
Testkube handles every part of running, managing, storing, and visualizing your k6 load testing scripts. Once a single execution finishes, it’s available to view on your Testkube dashboard.
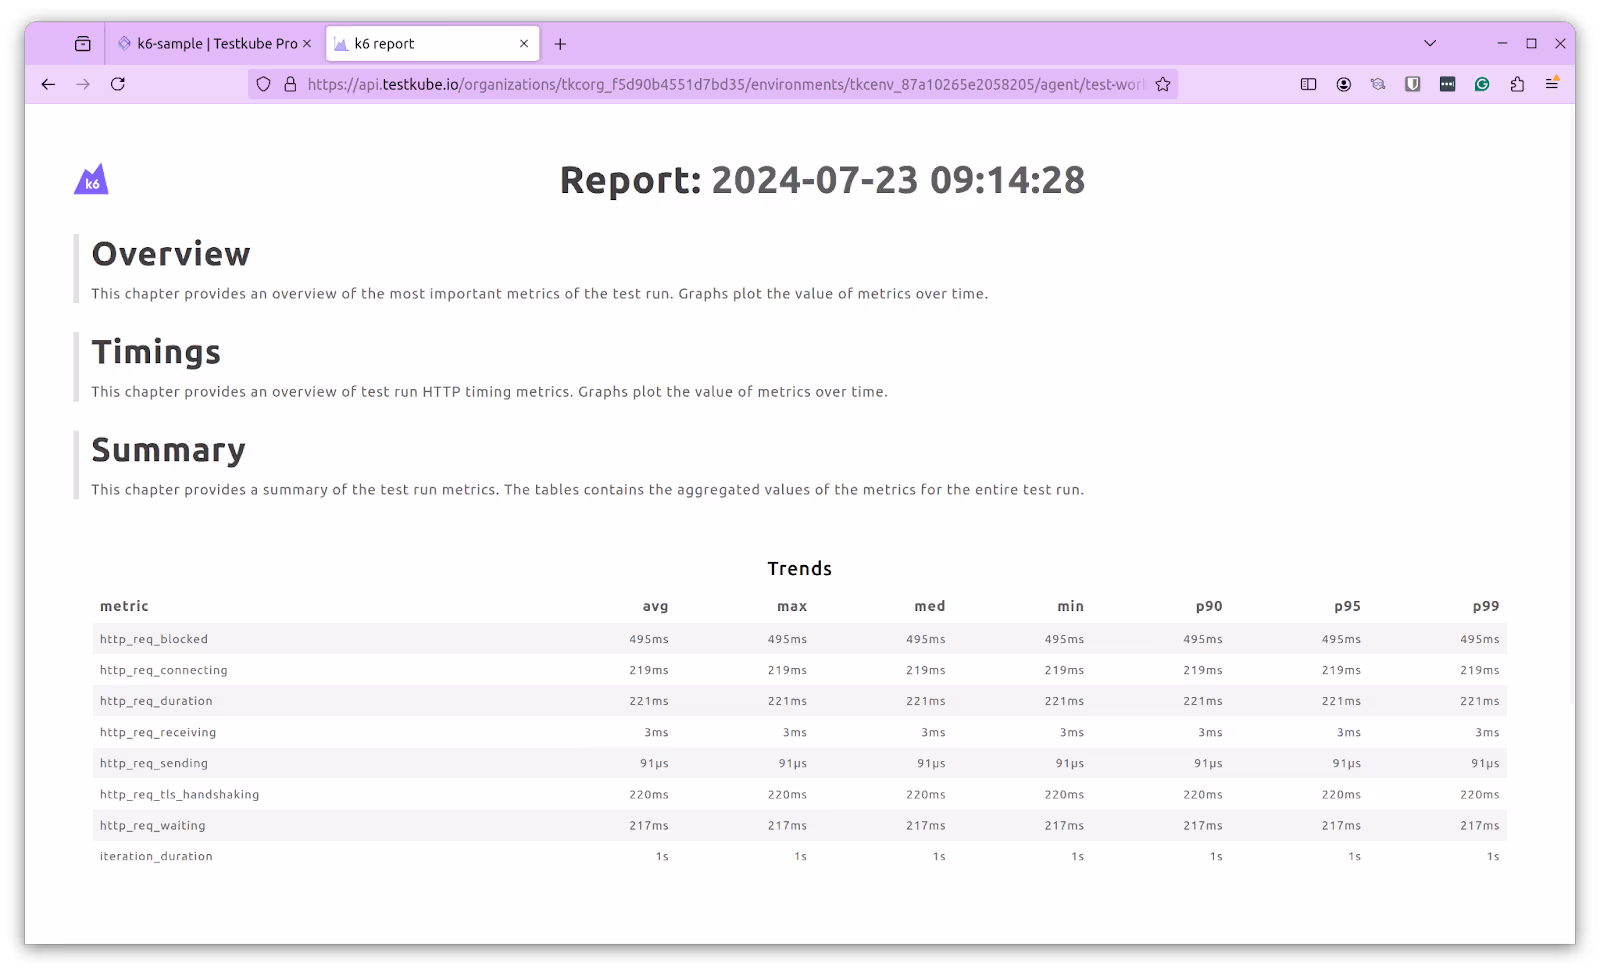
You can click on the “Open Details & Logs” link which will open a detailed view of the Test Workflow. Navigate to the “Artifacts” tab and click on the report.
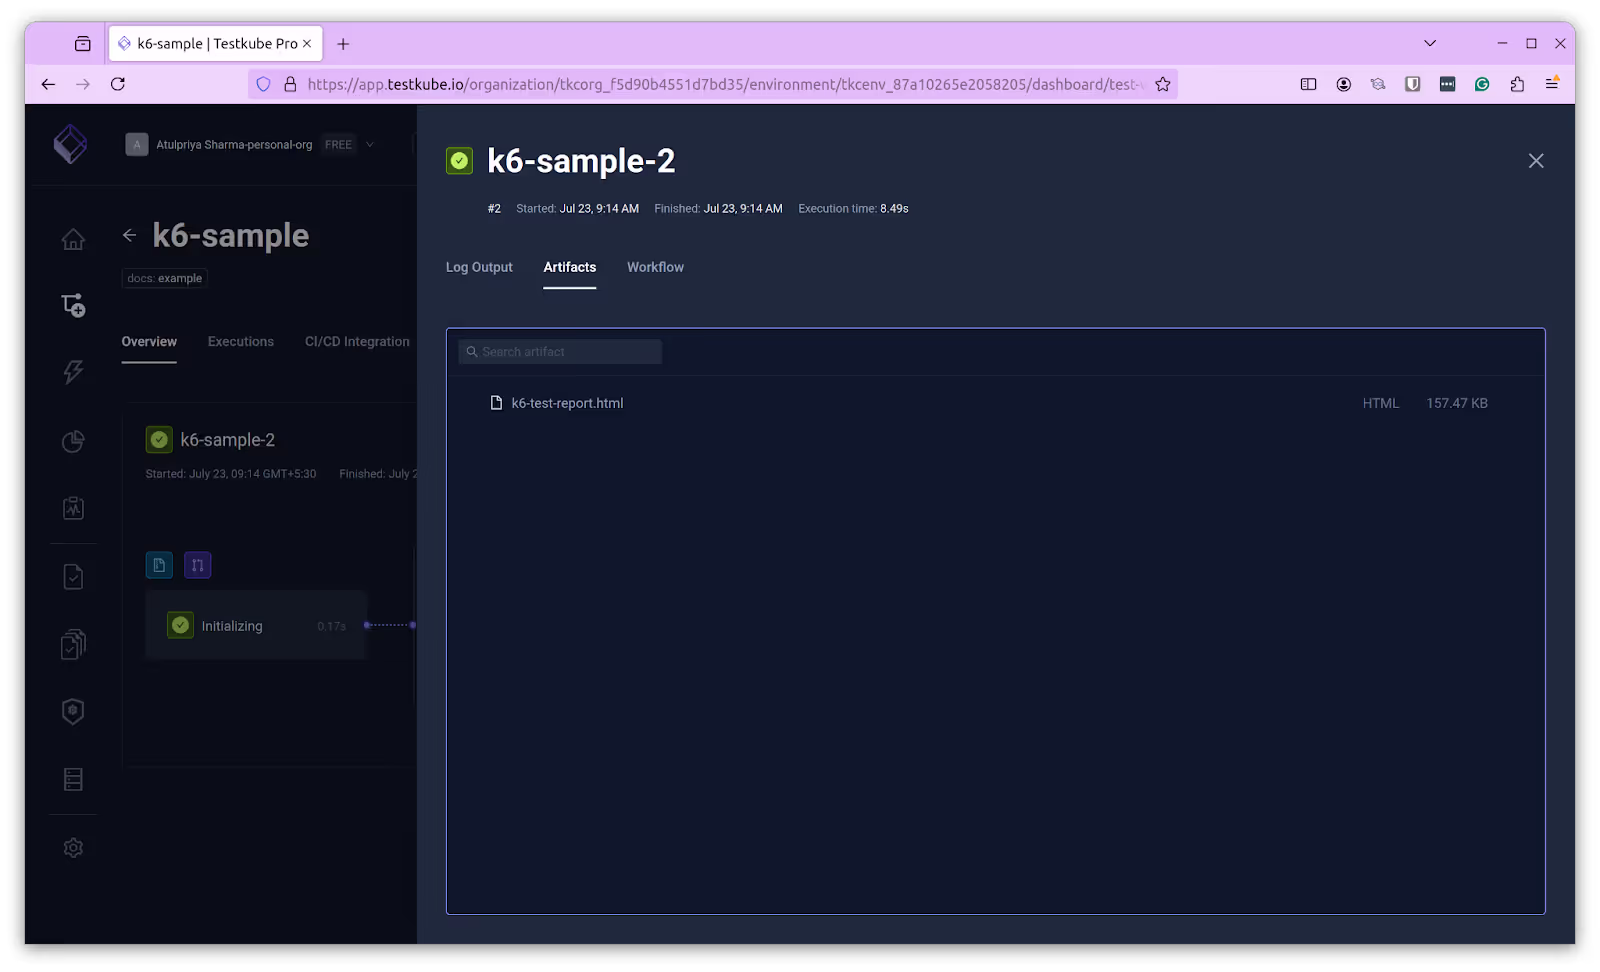
The report will open in a new tab where you can see all the details of the Test Workflow that you executed.
What’s next?
Now that you’ve run a k6 load test by leveraging your own Kubernetes infrastructure in a few quick steps without having to be a Kubernetes expert, you’re ready to add it as a step in your CI/CD pipeline alongside any other UI/API tests you might have already run. If you want to run a more elaborate load or performance tests, you can check out our tutorial on running distributed k6 load tests using Testkube.
With load testing built into your development lifecycle and all your results condensed into a single UI, you can start to understand how your cloud-native application performs over time and through significant change. Discover regressions, dig into root causes, and make optimizations.
I would love to hear all about your k6 load testing results and wins—the entire Testkube team, plus a vibrant community of fellow Kubernetes testers, are on Slack. Let me know what’s working for you and where you see more opportunities in the future. We’re just getting started in building the most comprehensive (and friendliest!) cloud-native testing framework for Kubernetes so feel free to follow us on X @testkubeio.
.webp)
.webp)
.webp)